This is a difficult trail that requires front and rear locking differentials, a decent amount of lift, and preferably at least 35" tires. I was able to do it with front and rear locking differentials and 33" tires, but I felt like my Jeep was not built enough for this trail. Erosion is heavy on this trail and the rating is constantly changing. This year the Red Rock 4Wheelers has it rated a 7, but just a few years ago it has been rated at 5-6.
Location
Moab, UT
Trailhead
This trail is typicall run starting from the northeast and heading southwest. To get to the trailhead you follow Kane Creek Blvd out of Moab heading south. This will transition to a well maintained dirt road. Follow this road until you see a sign indicating Kane Creek is to the left. Take this left turn at GPS coordinates 38.466217, -109.600904. This turn is 11.3 miles from the McDonald's in Moab.
Description
This is a fun trail that goes through the bottom of a canyon with some tall cliff walls. You cross the Kane Creek multiple times. This trip the water was low, but at times the water can get much higher. This is one I would avoid in a heavy rain storm.
This trail used to be an easy trail. I remember taking stock K5 blazer through this trail without too much difficulty when I was younger (in the 1990's). I finally had the opportunity to run this trail again this year in March, 2018.
This trail is so different I didn't even recognize it. There are scattered moderately difficult spots that have easier bypasses. These spots do require lockers, but they didn't cause much issues in our group of about 35 vehicles.
One of these unnamed areas, however, did cause me some trouble. I had a tire wedged between two rocks and I didn't realize it. My spotter told me to turn left and it didn't want to turn. After some spinning and repositioning, I was able to turn the tire and get over the obstacle. Sadly, I turned the wheel too hard and my power steering bent the tie rod. Luckily, with our group of 35 vehicles, we had the tools to repair the tie rod. Somebody even had a pickle fork to separate the ball joints on the tie rod and a 5 lb hammer! We popped the tie rod off, wedged it in a tow-recovery hook, and straightened it out with a winch. I destroyed the steering stabilizer, so I just took that off and replaced the tie rod and off we went. This repair took less than an hour.
One of the more memorable obstacles half way through the trail caused a lot of minor body damage to vehicles. More than half of the vehicles (mine included) scuffed up the passenger rear fender or flare. This obstacle has two rocks, and the one on the driver side wants to throw you into the rock on the passenger side. To make matters worse, you have a right turn while going around the rock that forces your rear end into the rock. I am not aware of any serious damage, but my fender is scuffed up. Like I said, only a few made it through unscathed. If you are willing to spend some time and build up the road a little, you may be able to get through without any marks.
One of the main obstacles is called Hamburger Hill. This is the main climb out of the canyon and has multiple boulders, ledges, and is just loose and torn up. Many vehicles had to take multiple lines at various places on this climb. Pick your line carefully and you should be fine. Front and rear lockers are highly recommended.
On Hamburger Hill there is a ledge that is getting larger each year. I was looking at pictures from just 2-3 years ago, and this was only a 2-3 foot ledge. This year the ledge was large enough that vehicles with a lot of lift, 35" tires (or larger), and front and rear lockers still could not make it up. One of the vehicles broke a front axle on this ledge during our trip. Luckily he was still able to drive out without replacing the axle since it was the front.
There is a "bypass" just to the left of the large ledge, but even this easier way is still rated a 6-7. Selectable lockers are not necessary, but they are a definite bonus. To follow the easier route you have to head right to the edge of the road and turn at the edge to keep your vehicle from falling down the edge. It is nice to turn the lockers off at this point so you can make the turn without much work. You still need front and rear lockers, though, to make it through the rest of the "easy" way.
Sadly, my Jeep was just having a bad day. As I was taking the "easy" way around the large ledge (I wasn't going to try it with a bent tie rod), I heard a loud "pop." I wasn't even spinning a tire. My spotter looked underneath and pulled out 4 pieces of my leaf spring and handed them to me. I still had the main leaf intact, but now my rear tire was only a half inch from the fender and would rub with any small bump. I was able to drive the rest of the way up Hamburger Hill even without a full leaf spring.
A short while later is an obstacle they called "The Waterfall." This is torn up, steep, with some moderate ledges. Compared to pictures from just a few years ago, this is MUCH worse than it was. I can't comment much on the current difficulty because I didn't drive up this ledge. With my bent tie rod and my broken leaf spring, I had a guy in front of me winch me up so I didn't break through the remaining leaf. I can say I didn't spin a tire going up this hill!
After this there are a few other small climbs. There is one moderately large ledge. Sadly, my electric actuator for my rear locker decided to not work, so I only had a front locker. I was unable to make it up the ledge, and with my broken leaf spring I wasn't going to bounce up it so I just took a strap.
This marked the last real obstacle and the rest was relatively easy until we got to pavement.
This trail is not for the weak hearted and you have to be willing to sacrifice some minor body damage (especially the right rear fender). If you are careful and take your time, you may be able to get through this unscathed. Having said that, I had a blast and thoroughly enjoyed every minute of this trail.
Download GPS file here!

This is the first little obstacle. It is actually pretty steep, loose,
and I saw one vehicle have their rear-end slide to the right into a little precarious position.


This little rock is bigger than it looks. You can see how high it is compared to my tires and sliders. I was the smallest vehicle in the group. Most could drive over the rock, but they still hit underneath. Since I was smaller, I went around, but I ended up sitting my slider on the rock and pivoting around since I couldn't go straight due to the rock wall on the passenger side of the vehicle.


This is Hamburger Hill. This is the nasty ledge that used to only be about 3 feet tall in the pictures I have seen. Most vehicles didn't make it up, even the ones with 37-40" tires. Yes, I felt like a little puppy tagging along with these huge vehicles.


The "easy" way is around to the left where the lady is walking. This is still difficult and lockers are required. I broke my leaf spring where the black XJ is located.
Now time for my damage report!

Here is the steering stablizer from when I bent the tie rod.
Luckily it was already shot and leaking, so I needed a new one anyway, right?
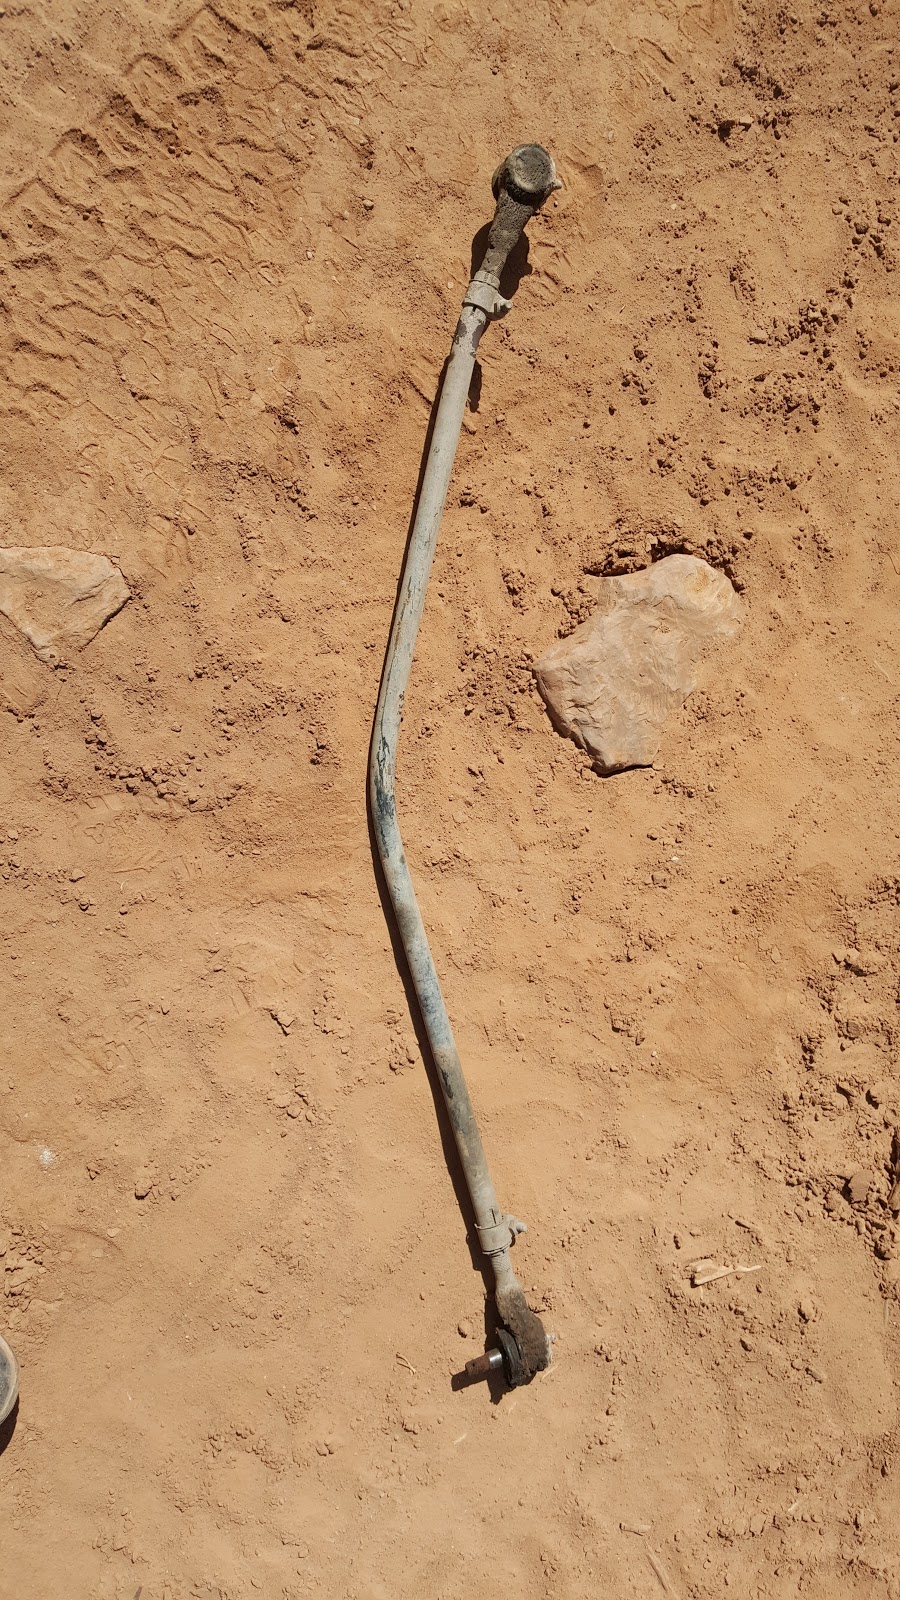
This is the bent tie rod. Man, it looks weak and thin.
I needed a new one as well--now I have a huge one!

These are the pieces that fell off of my leaf spring.

This is the front of the leaf spring. As you can see, they are all intact at the level of the axle, so the pin was stil in place and the ubolts were tight. That meant I could still drive. If you notice, one broken leaf is rusted, so that one has been broken for a long time and caused the rest to fail. Now I know why that side was sagging. Once again, I've been meaning to upgrade my lift so this was a good excuse to get the upgrade I wanted.

Here is the sagged rear spring. I was almost rubbing at rest...

The sliders held up well. I don't think I would recommend Line-X on sliders since this happens when you use them. oh-well, it isn't that noticeable and that is what sliders are for. The metal is just scuffed, no dent.

I ripped the Line-x off of the rear bumper cap as well. I'm in the market for a rear bumper, so this didn't bother me.

Here is the fender I rubbed on that rock. Just a scuff mark. The fender held up well, especially considering how hard I hit it! I'm going to have the Line-X guys spray a coat over it and it will look as good as new.
No comments:
Post a Comment