Wednesday, May 9, 2018

Buttes and Towers

Rating: 3
This is an easy trail. 4-wheel drive is necessary as there are a few loose areas and a few ledges. This is a great trail for the beginner, but nothing technical. There were a few ledges that some of the stock vehicles had to change their line a few times to make it up. A stock Jeep Wrangler, 4Runner, etc. would have no issues with this trail. There would be a few areas that may give a stock trail rated Jeep Renegade some issues due to clearance but I assume it would still be doable with some work.

Location
Moab, UT

Trailhead
This trail begins and ends at the exact same location as Seven Mile Rim. For a more challenging trail, consider Seven Mile Rim. If you are a beginner and don't have much experience, the Buttes and Towers trail is for you.

The trail begins north of Moab. It is on US Highway 191. If you are traveling north, it is 0.6 miles after the intersection with Utah Highway 313 and is to the left. GPS coordinates are 38°40'47.0"N 109°41'30.7"W (38.679731, -109.691869).
Description
This is an easy trail without any real technical climbs. There are a few loose areas and a few ledges, but nothing difficult. 4-wheel drive is a must (unless you're in a rock crawling buggy of course). I rate this as a "Sunday afternoon drive" type of trail.

This trail starts and ends at the same location as Seven Mile Rim. A few of the roads are shared between the two trails, but most of the roads are not shared. The biggest difference is that Seven Mile Rim goes on top of the rim and Buttes and Towers goes around the actual rim. The scenery is more impressive on the Seven Mile Rim trail, in my opionion, mainly because you have the views from on top of the rim. The rest of the trail shares the same scenery.

One of the highlights of the trail is a stop at Determination Towers. This is an interesting set of towers (see images below) that has a great parking lot and may serve as a great lunch spot. The name is from a letter describing the experience of a family in the 1950's. They had heard of these towers, and they set off in their old Jeep to find the towers. They spent all day in the heat searching for these towers. Their letter states they also had no roads to follow, so they were just blazing their own trail (as a note, back then there weren't regulations and it was legal to do this. Today, it is illegal to blaze your own trail so make sure you stay on existing roads). They said it was a long and difficult trip, so they named this Determination Towers. The name has since stuck. I am going to try to find the letter so I can include it here, but sadly I can't find it on an internet search. I will see if I can find the email of our leader who read us the letter and get a copy.

The trail also winds around near the Monitor and Merrimack Buttes. The Seven Mile Rim trail goes between these buttes, but this trail does not.

All-in-all this was an enjoyable trail. It was a relatively short trail compared to many others in the area. We left Moab at about 9:00 am and we were finished by 3:00 pm with a group of about 20 vehicles.

There is a maze of roads in the area--some of which have obstacles that are more difficult. I recommend using a GPS tracker to follow the posted route.


Here is a picture of Determination Towers in the distance.


Monitor and Merrimac Buttes in the distance.

Determination Towers are just above my hood.

Nice lunch spot. This is next to the Monitor and Merrimack Buttes.

This and the next pictures are pictures of Determination Towers at the parking area at their base.


Tuesday, May 8, 2018

Kane Creek

Rating: 7-8
This is a difficult trail that requires front and rear locking differentials, a decent amount of lift, and preferably at least 35" tires. I was able to do it with front and rear locking differentials and 33" tires, but I felt like my Jeep was not built enough for this trail. Erosion is heavy on this trail and the rating is constantly changing. This year the Red Rock 4Wheelers has it rated a 7, but just a few years ago it has been rated at 5-6.

Location
Moab, UT

Trailhead
This trail is typicall run starting from the northeast and heading southwest. To get to the trailhead you follow Kane Creek Blvd out of Moab heading south. This will transition to a well maintained dirt road. Follow this road until you see a sign indicating Kane Creek is to the left. Take this left turn at GPS coordinates 38.466217, -109.600904. This turn is 11.3 miles from the McDonald's in Moab.

Description
This is a fun trail that goes through the bottom of a canyon with some tall cliff walls. You cross the Kane Creek multiple times. This trip the water was low, but at times the water can get much higher. This is one I would avoid in a heavy rain storm.

This trail used to be an easy trail. I remember taking stock K5 blazer through this trail without too much difficulty when I was younger (in the 1990's). I finally had the opportunity to run this trail again this year in March, 2018.

This trail is so different I didn't even recognize it. There are scattered moderately difficult spots that have easier bypasses. These spots do require lockers, but they didn't cause much issues in our group of about 35 vehicles.

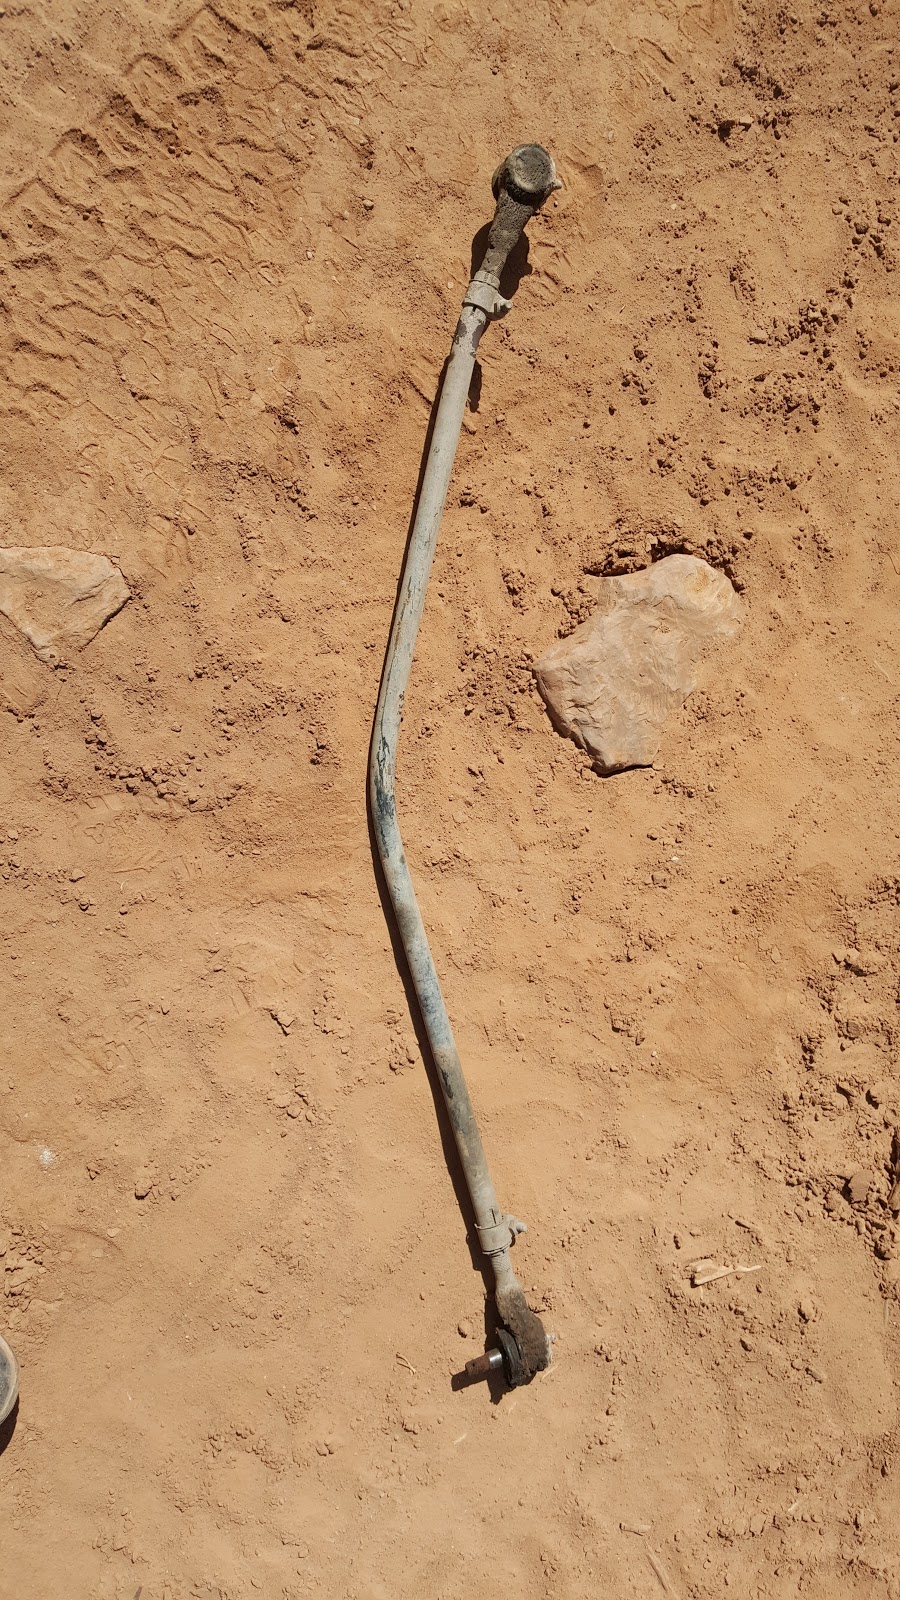
One of these unnamed areas, however, did cause me some trouble. I had a tire wedged between two rocks and I didn't realize it. My spotter told me to turn left and it didn't want to turn. After some spinning and repositioning, I was able to turn the tire and get over the obstacle. Sadly, I turned the wheel too hard and my power steering bent the tie rod. Luckily, with our group of 35 vehicles, we had the tools to repair the tie rod. Somebody even had a pickle fork to separate the ball joints on the tie rod and a 5 lb hammer! We popped the tie rod off, wedged it in a tow-recovery hook, and straightened it out with a winch. I destroyed the steering stabilizer, so I just took that off and replaced the tie rod and off we went. This repair took less than an hour.

One of the more memorable obstacles half way through the trail caused a lot of minor body damage to vehicles. More than half of the vehicles (mine included) scuffed up the passenger rear fender or flare. This obstacle has two rocks, and the one on the driver side wants to throw you into the rock on the passenger side. To make matters worse, you have a right turn while going around the rock that forces your rear end into the rock. I am not aware of any serious damage, but my fender is scuffed up. Like I said, only a few made it through unscathed. If you are willing to spend some time and build up the road a little, you may be able to get through without any marks.

One of the main obstacles is called Hamburger Hill. This is the main climb out of the canyon and has multiple boulders, ledges, and is just loose and torn up. Many vehicles had to take multiple lines at various places on this climb. Pick your line carefully and you should be fine. Front and rear lockers are highly recommended.

On Hamburger Hill there is a ledge that is getting larger each year. I was looking at pictures from just 2-3 years ago, and this was only a 2-3 foot ledge. This year the ledge was large enough that vehicles with a lot of lift, 35" tires (or larger), and front and rear lockers still could not make it up. One of the vehicles broke a front axle on this ledge during our trip. Luckily he was still able to drive out without replacing the axle since it was the front.

There is a "bypass" just to the left of the large ledge, but even this easier way is still rated a 6-7. Selectable lockers are not necessary, but they are a definite bonus. To follow the easier route you have to head right to the edge of the road and turn at the edge to keep your vehicle from falling down the edge. It is nice to turn the lockers off at this point so you can make the turn without much work. You still need front and rear lockers, though, to make it through the rest of the "easy" way.

Sadly, my Jeep was just having a bad day. As I was taking the "easy" way around the large ledge (I wasn't going to try it with a bent tie rod), I heard a loud "pop." I wasn't even spinning a tire. My spotter looked underneath and pulled out 4 pieces of my leaf spring and handed them to me. I still had the main leaf intact, but now my rear tire was only a half inch from the fender and would rub with any small bump. I was able to drive the rest of the way up Hamburger Hill even without a full leaf spring.

A short while later is an obstacle they called "The Waterfall." This is torn up, steep, with some moderate ledges. Compared to pictures from just a few years ago, this is MUCH worse than it was. I can't comment much on the current difficulty because I didn't drive up this ledge. With my bent tie rod and my broken leaf spring, I had a guy in front of me winch me up so I didn't break through the remaining leaf. I can say I didn't spin a tire going up this hill!

After this there are a few other small climbs. There is one moderately large ledge. Sadly, my electric actuator for my rear locker decided to not work, so I only had a front locker. I was unable to make it up the ledge, and with my broken leaf spring I wasn't going to bounce up it so I just took a strap.

This marked the last real obstacle and the rest was relatively easy until we got to pavement.

This trail is not for the weak hearted and you have to be willing to sacrifice some minor body damage (especially the right rear fender). If you are careful and take your time, you may be able to get through this unscathed. Having said that, I had a blast and thoroughly enjoyed every minute of this trail.

Download GPS file here!


 This is the first little obstacle. It is actually pretty steep, loose,
and I saw one vehicle have their rear-end slide to the right into a little precarious position.


  This little rock is bigger than it looks. You can see how high it is compared to my tires and sliders. I was the smallest vehicle in the group. Most could drive over the rock, but they still hit underneath. Since I was smaller, I went around, but I ended up sitting my slider on the rock and pivoting around since I couldn't go straight due to the rock wall on the passenger side of the vehicle.


This is Hamburger Hill. This is the nasty ledge that used to only be about 3 feet tall in the pictures I have seen. Most vehicles didn't make it up, even the ones with 37-40" tires. Yes, I felt like a little puppy tagging along with these huge vehicles.


The "easy" way is around to the left where the lady is walking. This is still difficult and lockers are required. I broke my leaf spring where the black XJ is located.


Now time for my damage report!

 Here is the steering stablizer from when I bent the tie rod.
Luckily it was already shot and leaking, so I needed a new one anyway, right?
This is the bent tie rod. Man, it looks weak and thin.
I needed a new one as well--now I have a huge one!
These are the pieces that fell off of my leaf spring.

This is the front of the leaf spring. As you can see, they are all intact at the level of the axle, so the pin was stil in place and the ubolts were tight. That meant I could still drive. If you notice, one  broken leaf is rusted, so that one has been broken for a long time and caused the rest to fail. Now I know why that side was sagging. Once again, I've been meaning to upgrade my lift so this was a good excuse to get the upgrade I wanted. 
Here is the sagged rear spring. I was almost rubbing at rest...
 The sliders held up well. I don't think I would recommend Line-X on sliders since this happens when you use them. oh-well, it isn't that noticeable and that is what sliders are for. The metal is just scuffed, no dent.
I ripped the Line-x off of the rear bumper cap as well. I'm in the market for a rear bumper, so this didn't bother me.
Here is the fender I rubbed on that rock. Just a scuff mark. The fender held up well, especially considering how hard I hit it! I'm going to have the Line-X guys spray a coat over it and it will look as good as new.

Friday, November 3, 2017

Yankee Boy Basin

Rating: 3-4
This is a fairly easy trail, but it does increase in difficulty as you go higher.  The road surface is similar to the nearby Imogene Pass, but Yankee Boy doesn't have the loose ledges seen on Imogene.

Location
Ouray, CO

Trailhead
This has the same beginning as Imogene Pass.  It is located along the first hairpin turn. If you are heading in the southern direction, the road is to your right. There is a large, wooden sign on the left that says "Box Canyon Falls" and has an arrow pointing to the right. This is the road you need to take. GPS coordinates of the turnoff are 38.017649, -107.674578.

Description
This beginning of Imogene Pass and Yankee Boy Basin share the same road. 4.7 miles after you leave the highway, there is an intersection. To the left is Imogene Pass, and to the right is Yankee Boy Basin.

This is a short trip, about 8-9 miles one way and most of the road is fairly fast. The beginning is a well maintained gravel road, but as you increase in elevation the road is less maintained. There is nothing technical about this road, and it is appropriate for beginners. The road is wide in most areas and there is typically plenty of room to pass oncoming vehicles.

This is a great road if you only have a short time in Ouray and you want to get off of the pavement. Remember, this is an "out-and-back" style and so you will return the same way.

I apologize, I cannot find my pictures of Yankee Boy Basin, but I will look on my other computer and see if I took them with my camera instead of my phone.

Here is a map and google generated KML file.

Imogene Pass

Rating: 4-5
This is a road that definitely requires 4-wheel drive and low range. There are a few short climbs or descents that are loose shale and have a few steps. There are areas where you can take a more difficult line which gives it a rating as high as 5. If you avoid the more difficult paths, the rating drops to a 4.

A stock wrangler should have no issues completing this trail, however smaller vehicles may have difficulty.

Location
Between Telluride and Ouray Colorado

Trailhead
The Ouray side is located as you are leaving Ouray to the south on highway 550. It is located along the first hairpin turn. If you are heading in the southern direction, the road is to your right. There is a large, wooden sign on the left that says "Box Canyon Falls" and has an arrow pointing to the right. This is the road you need to take. GPS coordinates of the turnoff are 38.017649, -107.674578.

The Telluride side starts from the north-end of Telluride. When you are diving down the main road through telluride, turn left onto Aspen St, then right onto Galena Ave, the left onto Oak St. Oak turns into the road for Imogene Pass. The coordinates of the beginning of the road are 37.940089, -107.811790.

Description
This road is often combined with Black Bear Pass to make a loop. If you are planning on doing the loop, remember that Black Bear Pass is one-way from Ouray to Telluride. Although people are more intimidated by Black Bear due to the tight and narrow switchbacks, I personally feel this trail is a little more technical.

This is a road that connects Telluride and Ouray, CO. This is a popular, well traveled road and is usually busy even during the week. The views are spectacular the entire length of the trail.

If you are starting from the Ouray side, there is a left turn you have to make. Follow the main road for about 4.7 miles after you leave highway 550. There is a well traveled left turn at this intersection, which is the Imogene Pass road. If you continue straight (right), it will take you up Yankee Boy Basin. This intersection is obvious when travelling from Telluride, just continue straight downhill.

One of the highlights of the trail is the Tomboy Mine and ghost town. The elements have been hard on the area and there aren't many standing structures, but the remnants are still present and you can get a sense of how large the area was. The mining town of Tomboy was large, and even had a YMCA and tennis courts! The nearby mine started producing gold in 1894 and was sold in 1897 for $2 million! Main operations of the mine continued until 1928.

There are a few loose climbs (or descents depending on the direction) on the Telluride side, but there are easy routes. There are also a few loose areas with ledges on the Ouray side which can be a little more difficult depending on recent traffic and weather.

This trail often does not open until about the 4th of July. Even that early, they still have to bring in bulldozers to clear out the snow in the big drifts.

Here is the KML and map of the trail. The KML file was lost from my GPS (phone died) so this file was created using Google Maps.


 This is a picture of the switchbacks on Black Bear Pass.


 This is in the area of the Tomboy Mine and Ghost Town. 

 This picture and following pictures of this loose climb were the hardest part of the day.
You can see the bypass in the background of the next picture. 


 This was taken on July 5th, days after they opened the trail to traffic.
You can see how they had to bulldoze through the snowdrift. 


A measly 13,114 ft...


This little ledge wasn't too difficult, but I have seen a rollover
here due to the loose shale causing the vehicle to slide sideways.
Don't forget to wear your seatbelts! 

Thursday, November 2, 2017

Black Bear Pass

Rating: 4
This trail is not difficult from a technical standpoint. There are a few loose ledges that can be hairy if you take a bad line (another 4Runner slid and it rolled onto its side earlier that day), but if you go slow and carefully it isn't bad.

Location:
This is located between the summit of Red Mountain Pass and Telluride.

Trailhead
This trail is ONE WAY and the beginning is located near the summit of Red Mountain Pass (highway 550). The road is located 0.2 miles to the south of the sign marking the summit. The road is to the west. Coordinates are 37.896734, -107.713392. Once you are on the dirt road, it is well marked and there at any intersection directing you to Black Bear Pass.

Description
This road is often combined with Imogene Pass to make a loop. If you are planning on doing the loop, remember that Black Bear Pass is one-way from Ouray to Telluride.

This road has a reputation for being dangerous. The switchbacks are narrow and on a steep slope. Although the road isn't steep, the slope of the hill is steep enough that the switch backs are narrow and a few of them require at least a 3-point turn. It is recommended that you check your brakes before attempting this road. This road is NOT for the fainthearted or the novice off-roader.

The switchbacks are so narrow that it is impossible to pass an oncoming vehicle. For this reason, the road is ONE WAY at the switchbacks and you can only travel in the downhill direction. You must start from the east side and travel toward Telluride. The bottom of the switchbacks are wider and there is two-way traffic up to the Bridal Veil Falls.

Most of the road is a simple road that isn't difficult. There are a few short climbs that are a little loose, but there is nothing technical for most of the trail. The hardest part of the road is immediately before the switchbacks. These are a series of small ledges that are off camber. The ledges are not perpendicular to the road. In addition to being off camber, the ledges are also a loose shale and it is easy to slide. I didn't think it was too bad, but earlier in the day another 4Runner had rolled onto its side. I assume it wasn't a great line and it was made worse from sliding on the loose surface. I ended up going down the small ledge more perpendicular and it wasn't even exciting.

After the first series of ledges, the road narrows. The surface is loose at this location and there are a few more small ledges. Make sure you have a good line and go slow. Don't be afraid to use a spotter to watch your line because the road is fairly narrow.

Once you complete the ledges, the rest of the road is easy. Although the switchbacks are easy and there is nothing technical, they do have a strong pucker factor. The road is narrow so there is no room for error. Make sure you know your line and the location of your tires. Don't get too close to the edge OR the inner side of the road. There is a youtube video of somebody who went up the inner wall and rolled down part of the hill (they were unharmed, the Jeep was much worse).

A few of the switchbacks are so tight that you have to do a 3-point turn. I was worried about this part, but it isn't steep and I never felt out of control.

Once you go down the narrow section, the road widens and two-way traffic begins. This is the location of the Bridal Veil Falls and Power Plant. These falls are gorgeous and can be seen from Telluride.

Here is the KML and map of the trail.


We had just put a 2" lift and 33" tires on the 4Runner a week before. 
We did Black Bear to try them out.  


 As you can see, most of the road is simple and not technical.


 What a great sign


 This is the beginning of what a lot of people call "The Ledges." It isn't very difficult, but it is a little off camber and the loose shale makes it a little more interesting. A good line and careful driving should keep you safe. This is where another 4Runner rolled onto it's said earlier in the day.


 This picture is very misleading. This was actually very narrow and the slope to the passenger side is very steep. This picture really flattened things out. Telluride is thousands of feet below and it is a steep hill. This picture is taken near the small waterfall at the top left of the next picture. 

This shows the switchbacks nicely. This is taken from the Imogene Pass road.
This is Bridal Veil Falls and power plant. 

This is Bridal Veil Falls. It is 365 feet high.